
Healthy Tiramisu: Wholefood bliss!
Jan 25, 2018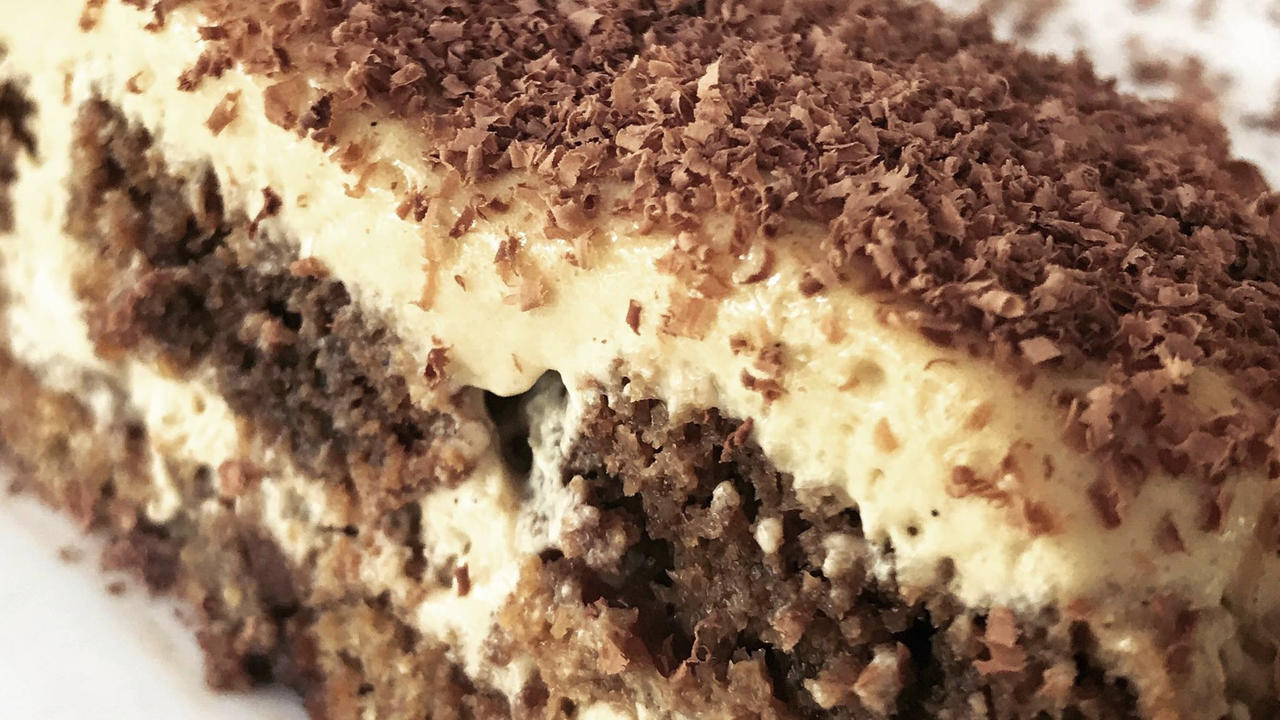
I’m sad to have finished the recipe testing for this one. Granted, it may have triggered a temporary relapse into coffee addiction. (After 15 years of virtual abstinence!) But we had such a nice little routine going in our house for several weeks there. Breakfast, a bit of work around the farm, then a mid-morning slice of healthy tiramisu. It was nourishing on many levels. Self-care for the soul. And I started to cherish and keenly anticipate the ritual. (Might have been the addiction talking.)
I finally worked out why this recipe is such a revelation.. it’s kind of show-stopping (you’ll see)! One idea that we explore in depth in my program, is that nutrient dense foods are actually the most flavourful. And that our taste buds are in fact, engineered to discern and savour nutritional complexity – at least, once we return to our intended diet of real food. Fresh veggies, from mineral-rich soils are worlds apart from the supermarket stuff, for example. Even young children can taste the difference – hence, their eagerness to eat homegrown produce!
So when I made this healthy tiramisu from our chickens’ freshly laid, organic eggs (an entire dozen of them!), locally grown organic coffee and unrefined rapadura sugar with all its nourishing minerals intact – the result was electric. In a different ball park than what you might have tried before, as hard to imagine as that might be for fellow tiramisu lovers.
Naturally, I also dodged the highly processed, pre-packaged savoiardi biscuits and went with Jude Blereau’s delicious genoise sponge. Non-bakers, trust me – it’s not difficult. And even if it fails miserably, you’re drowning it in coffee and cream. So proceed with confidence, knowing that there IS no fail on this occasion!
My Gluten & Dairy free tiramisu
Now, you may have missed it, but I’d posted the gluten and dairy free version, last week. If you’re strictly avoiding gluten and dairy, then that’s the healthy tiramisu for you. However, if you can tolerate a small amount of gluten, this recipe uses 1 cup of spelt flour for 8 large servings. That’s only 1.5 (Australian) tablespoons of flour per serving and makes for a much fluffier, more absorbent cake.
The dairy free cream is actually just as delicious as the original and isn’t an obvious deviation at all, in terms of flavour. So, definitely worth a try at some point, even if dairy has a place in your diet.
")
This healthy tiramisu recipe uses the lovely Jude Blereau's genoise method, found here. See the instructions below.
Ingredients
- ¾ cup ground coffee, steeped in 1 cup of boiling water (see notes)
- ¼ cup Marsala
- 1 tsp vanilla essence (optional - I just really like vanilla!)
- 175g of thickened cream
- 250g of mascarpone (see notes)
- 1 tsp vanilla essence
- 2 whole eggs (see notes)
- 5 egg yolks
- 100g milled and sifted rapadura sugar (see notes)
Instructions
- This element should be made at least a few hours in advance. You can also make it the day before and store it covered, at room temperature, overnight. Follow Jude Blereau's recipe, just be sure to mill and sift the rapadura sugar before beating it with the eggs as some brands are very coarse.
- Prepare all your ingredients first. Then organise a medium sized dish (approx. dimensions 20cm x 30cm), or individual serving glasses to layer the tiramisu into.
- Measure out the thickened cream, mascarpone and vanilla in a small bowl. Stir vigorously to combine, then set aside to come to room temperature.
- Make sure the eggs are at room temperature before starting this step. In a large mixing bowl (or processor with whipping attachment), beat the egg yolks, whole eggs and milled, sifted rapadura sugar until it lightens, doubles in volume and forms ribbons that sit on the surface for at least 10 seconds. This will take a while (usually 10+ minutes) and is the exact same process you will have used for the sponge.
- Using a spatula, gently fold the cream mixture into the eggs until it is just combined, then set aside.
- Strain the coffee into a medium mixing bowl. Add the Marsala and vanilla essence, stirring to combine. Ensure it is no longer hot before beginning the next step.
- Place the cake on a large chopping board and remove the outer crust of the cake, by slicing around the edge. Then, working your way from left to right, slice the cake into 2cm wide 'fingers'. And finally, one big transverse slice across the lot of them, chopping them in half.
- Pick up one of the fingers from the middle of the cake (you may need to adjust the length of it, according to the container size) and momentarily dip each of the two longer ‘cut’ sides into the coffee mixture, one after the other, then place it back onto your chopping board, (top side up, like all the other fingers). Slice it in half lengthways again (with the knife parallel to the two cut sides). You’ll hopefully find that the middle is still just-slightly dry, rather than being drenched all the way through (if not, adjust your method).
- Lay the two halves, dry side down, into your dish and repeat this process until you’ve used up the first half of the cake – and hopefully filled the base of your dish. Don’t worry too much if it isn’t perfect. The cream layer compensates for errors of judgement!
- Pour just under half the cream mixture over the cake base and tilt the dish gently from side to side to help level it out. Place the dish into the fridge (20 minutes) or freezer (10 minutes) to set. This prevents the second layer of cake from drowning in the cream. That sounds incredibly romantic, but will result in a very messy tiramisu. (Ok, it still tastes the same, if you’re in a mad hurry!)
- Remove the dish from the fridge and proceed with the second layer, following the exact same process as with the first. Pour the remaining cream over the top, then cover your dish and allow the tiramisu to set in the fridge. Ideal setting time is 12-24 hours, but definitely 6 as an absolute minimum.
- Serve chilled, after grating a nice thick layer of good quality dark chocolate over the top. Use a microplane if you have one. (If you don’t, get one! They make parmesan, chocolate and other garnishes into powdery snow.)
Notes
Coffee: Although I'm a retired coffee drinker (and always detested strong, black coffee), this recipe needs the strong flavour to balance it. Please, just try it once and if it's too much, you can reduce it by 2-3 tablespoons. Be sure to give it a full 12 hours to settle as the flavour will mellow with time.
Rapadura sugar: Feel free to play with this amount. It wont affect the recipe in any way. If you're trying to wow non-wholefoodie types, you may like to use 120g sugar. If you've been on a fairly low carb, wholefood diet for a while, you can take it back to 90, or even less. Again, I'd try the amount listed here first and then adjust.
Eggs & texture: You can play with the ratio of egg yolks to whole eggs. Lowering the yolks in proportion to the whites will result in a lighter, fluffier texture and vice versa.
Mascarpone: my favourite local brand is Pepe Saya, which comes in a 200g tub. However, if you're buying a generic supermarket brand, it will most likely come in a 250g container. Varying the amount wont give you a remarkably different result, aside from the fact it sets slightly better with more mascarpone added. If you like a really thick-set, heavy texture - you could replace the cream entirely with mascarpone. I loved the result of 400g mascarpone and no cream, but it does add more a sour note to the dessert.
Stay connected with news and updates!
Join our mailing list to receive the latest news and updates from our team.
Don't worry, your information will not be shared.
We hate SPAM. We will never sell your information, for any reason.
